Server Setup (Roles, RCON, & Logs)
Now that your Discord server has been approved, it's time to connect the bot to your Rust Console server. We will cover assigning staff roles, setting up log channels, and establishing the RCON connection.
Where you find your RCON details depends entirely on your host, so pick one and the guide will show only the steps that apply to you. Rust Console servers are hosted through two official partners.
Details live under the Status and Basic Settings tabs.
Show G-Portal steps →Details live on the Dashboard and the General settings tab.
Show Nitrado steps →Not sure? Check the confirmation email from whoever you bought the server from — it will name the host. You can switch at any time.
This guide walks you through the whole /setup server process: getting your RCON details from your host, then connecting the bot. You can do the connection step on the Web Dashboard or through Discord slash commands — both are covered.
Step 1 — Get your RCON details
The bot needs three things from your host: your Server IP, your RCON Port, and your RCON Password. Grab all three before you start, because the connection is tested live and nothing is saved unless it succeeds.
Copy, don't retype
RCON passwords are case sensitive, and the RCON port is usually not the same as your game port. Mistyping either is the most common reason a connection is refused. Enter the IP on its own with no :port on the end.
Finding your details on G-Portal
Status Tab
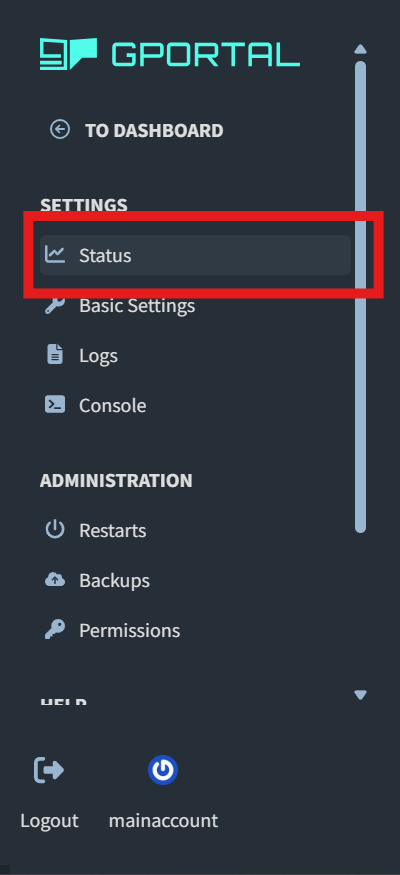
On Gportal, to find the Server IP and RCON Port, go onto the Server Settings Tab and click "📈 Status".
Access Data
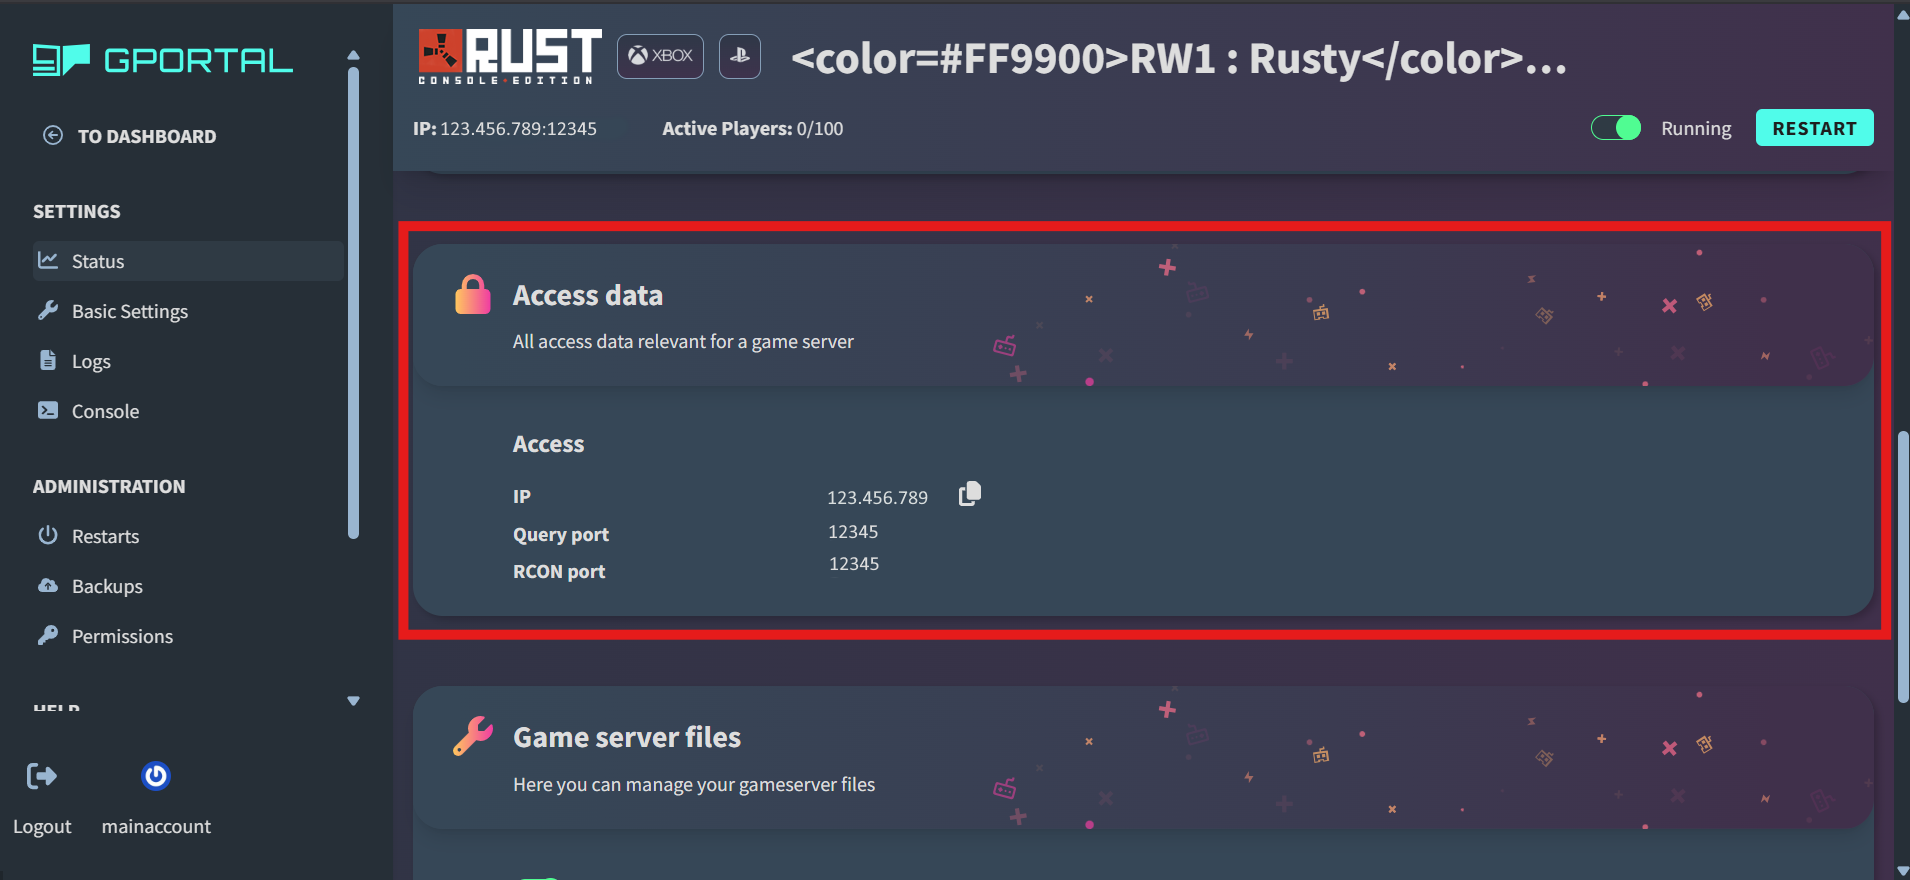
Scroll down on the page until you see 🔒 Access data. From there, copy the Server IP and RCON Port. You will need these!
Basic Settings Tab
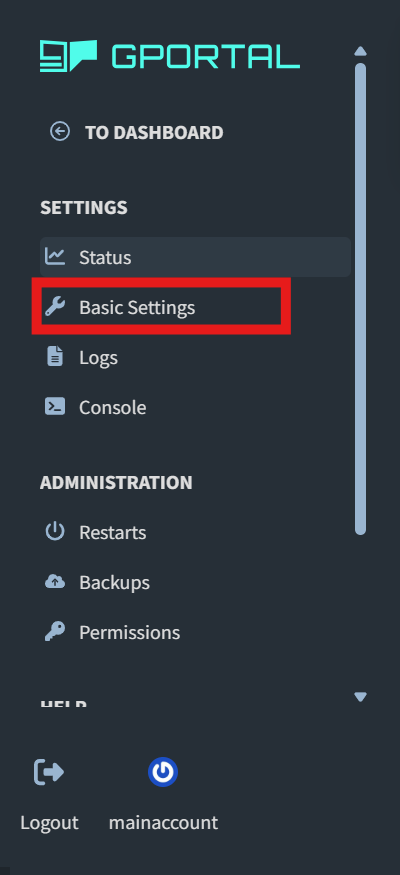
To get the RCON Password, please go back to the Setting Tab and click the "🔧 Basic Settings" tab.
RCON Password
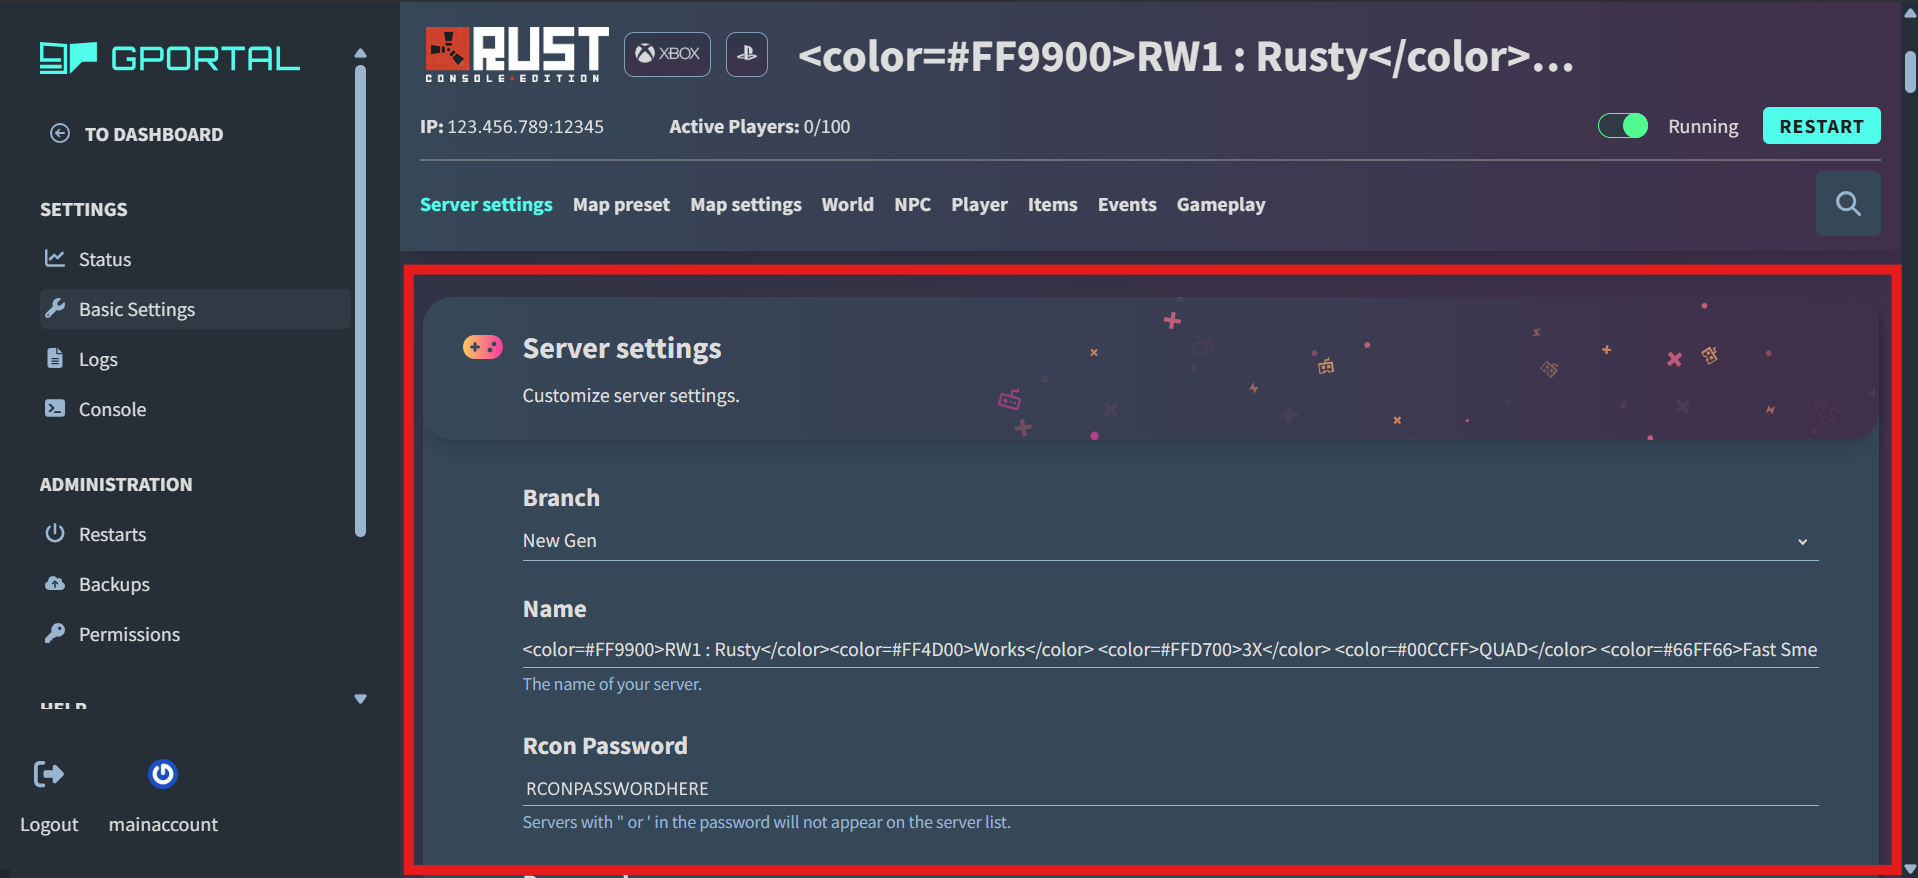
Scroll down a little bit on the page until you see 🎮 Server settings. From here, copy the RCON Password.
Finding your details on Nitrado
Dashboard
On Nitrado, you can find the Server IP right on the "Dashboard" as soon as you load up your server. Scroll down until you see Server Status.
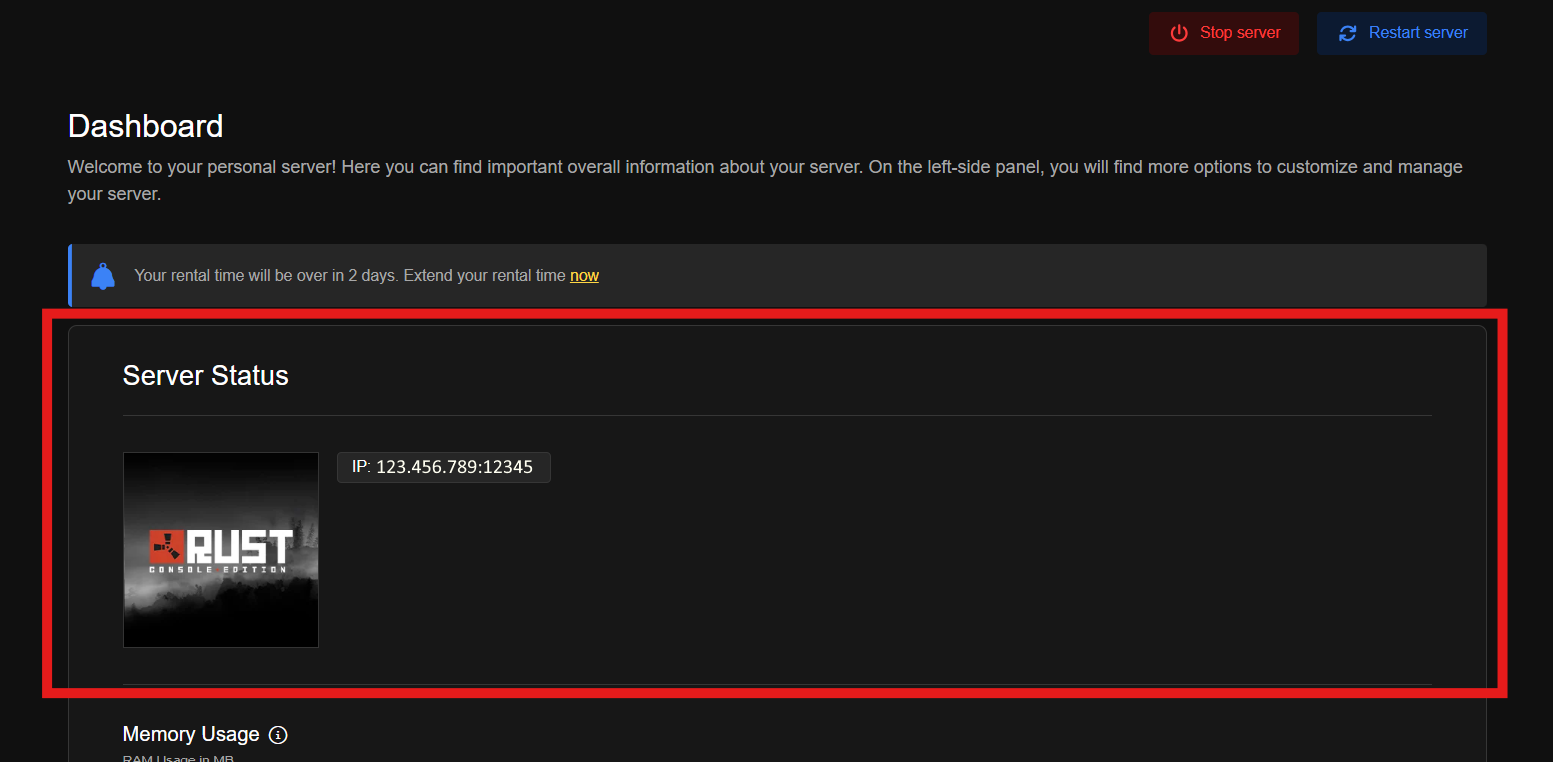
RCON Port
To find the RCON Port, keep scrolling down on the Dashboard and find Ports. Copy the RCON Port.
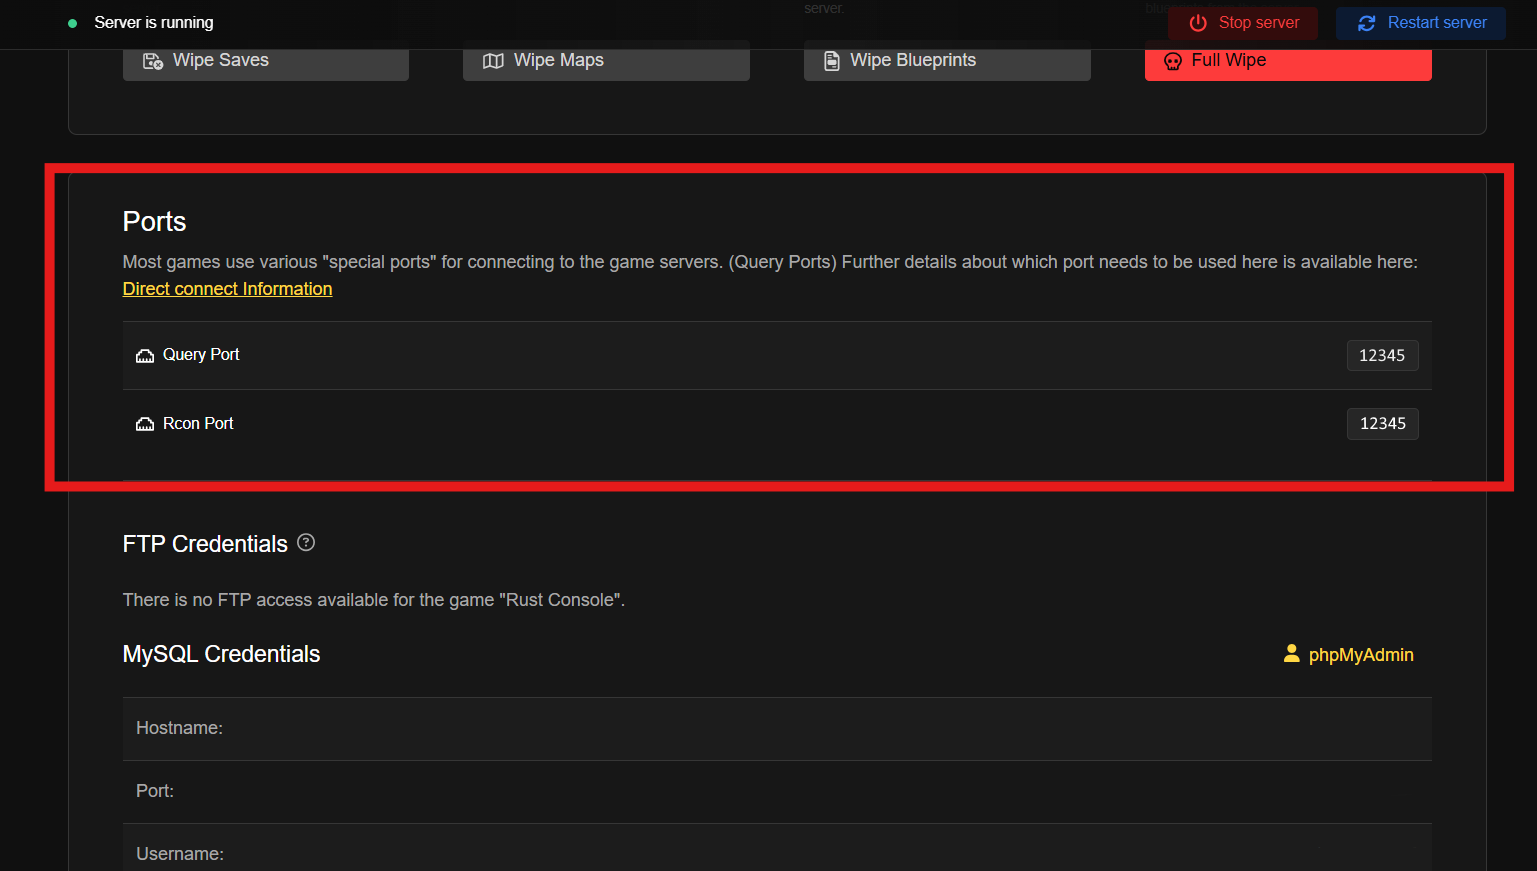
On Computer (Optional)
Additionally, on a computer you don't need to scroll on the Dashboard as the IP and RCON port are displayed in the top left.
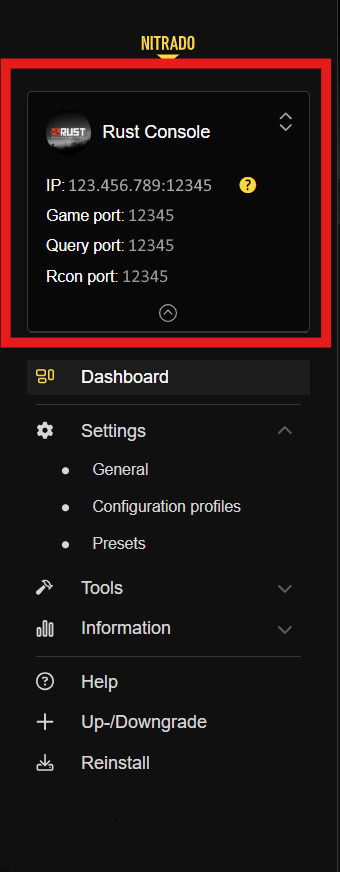
General Settings
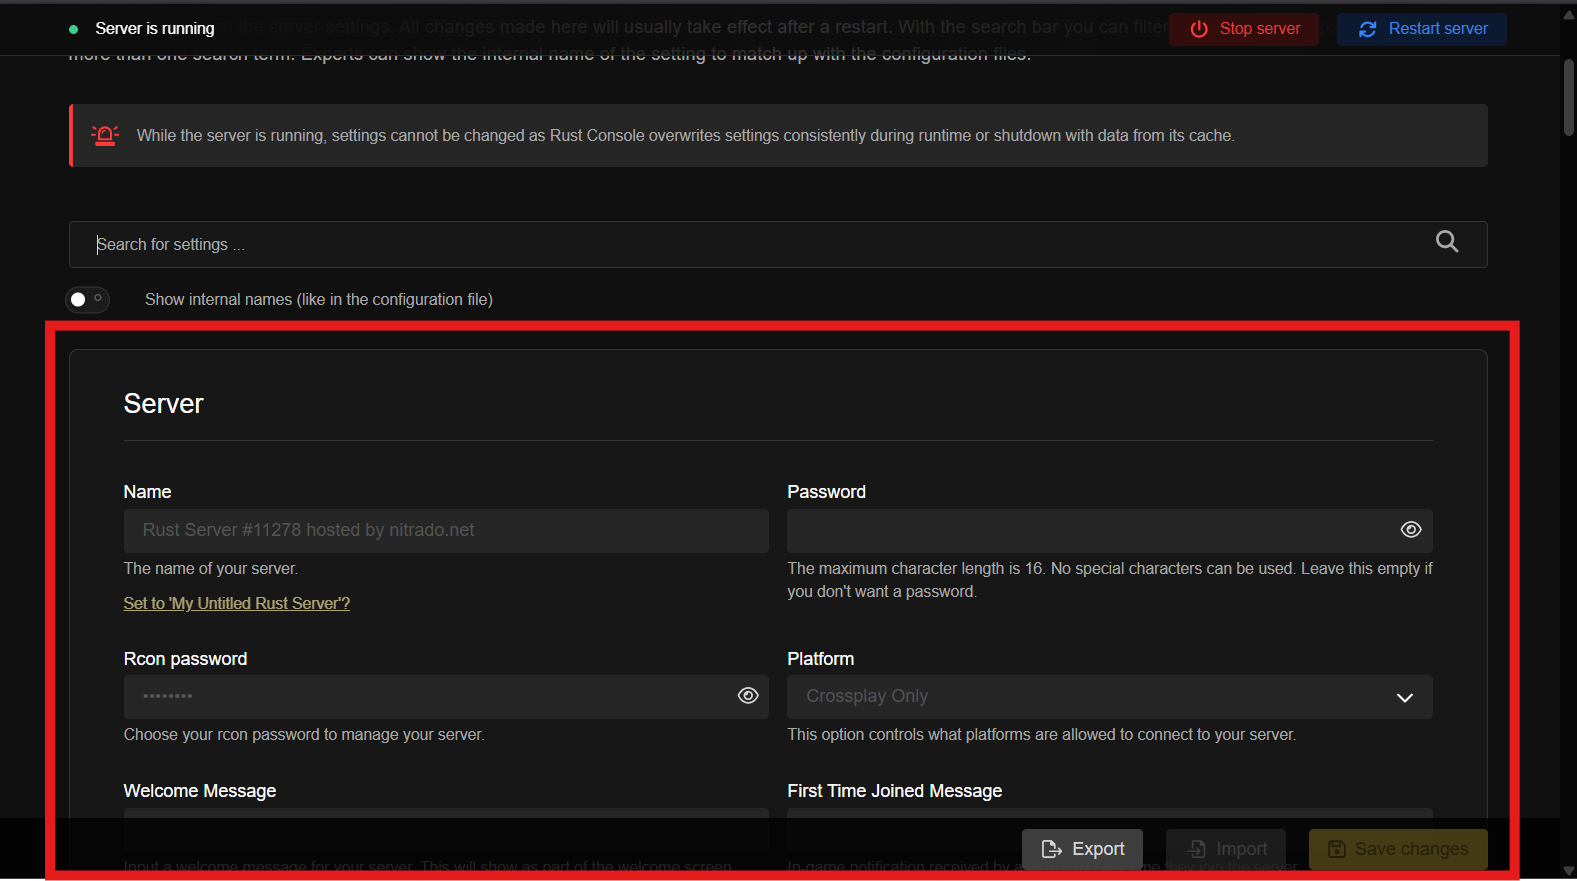
To get the RCON Password, please go back to the Settings tab and click the "General" tab.
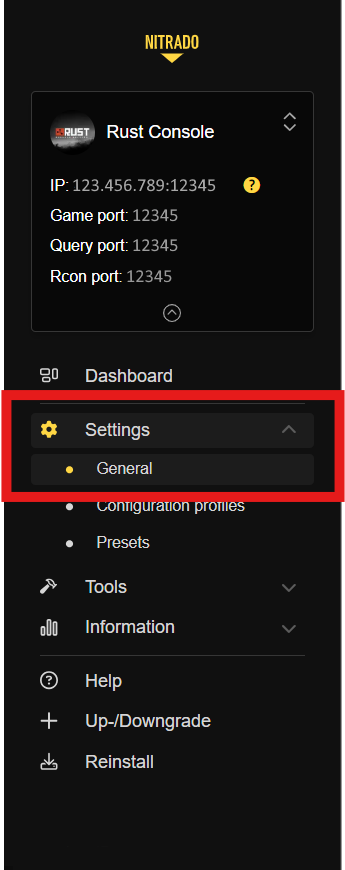
RCON Password
Scroll down a little bit on the page until you see Server. Click the Eye icon next to RCON Password to reveal the password, then copy it.
Got all three?
Keep them somewhere safe and private — anyone with your RCON password has full control of your server. Once saved, the bot never shows the password back to you.
Step 2 — Connect the bot
Now pick how you want to do it. Both routes do exactly the same thing and save to the same place, so use whichever suits you.
Web Dashboard
Full-size forms, easier for anything involving a lot of typing.
No website neededDiscord — /setup server
An interactive wizard, entirely inside your Discord server.
Route A — Web Dashboard
The Web Dashboard is the fastest and easiest way to configure your server.
Access the Dashboard
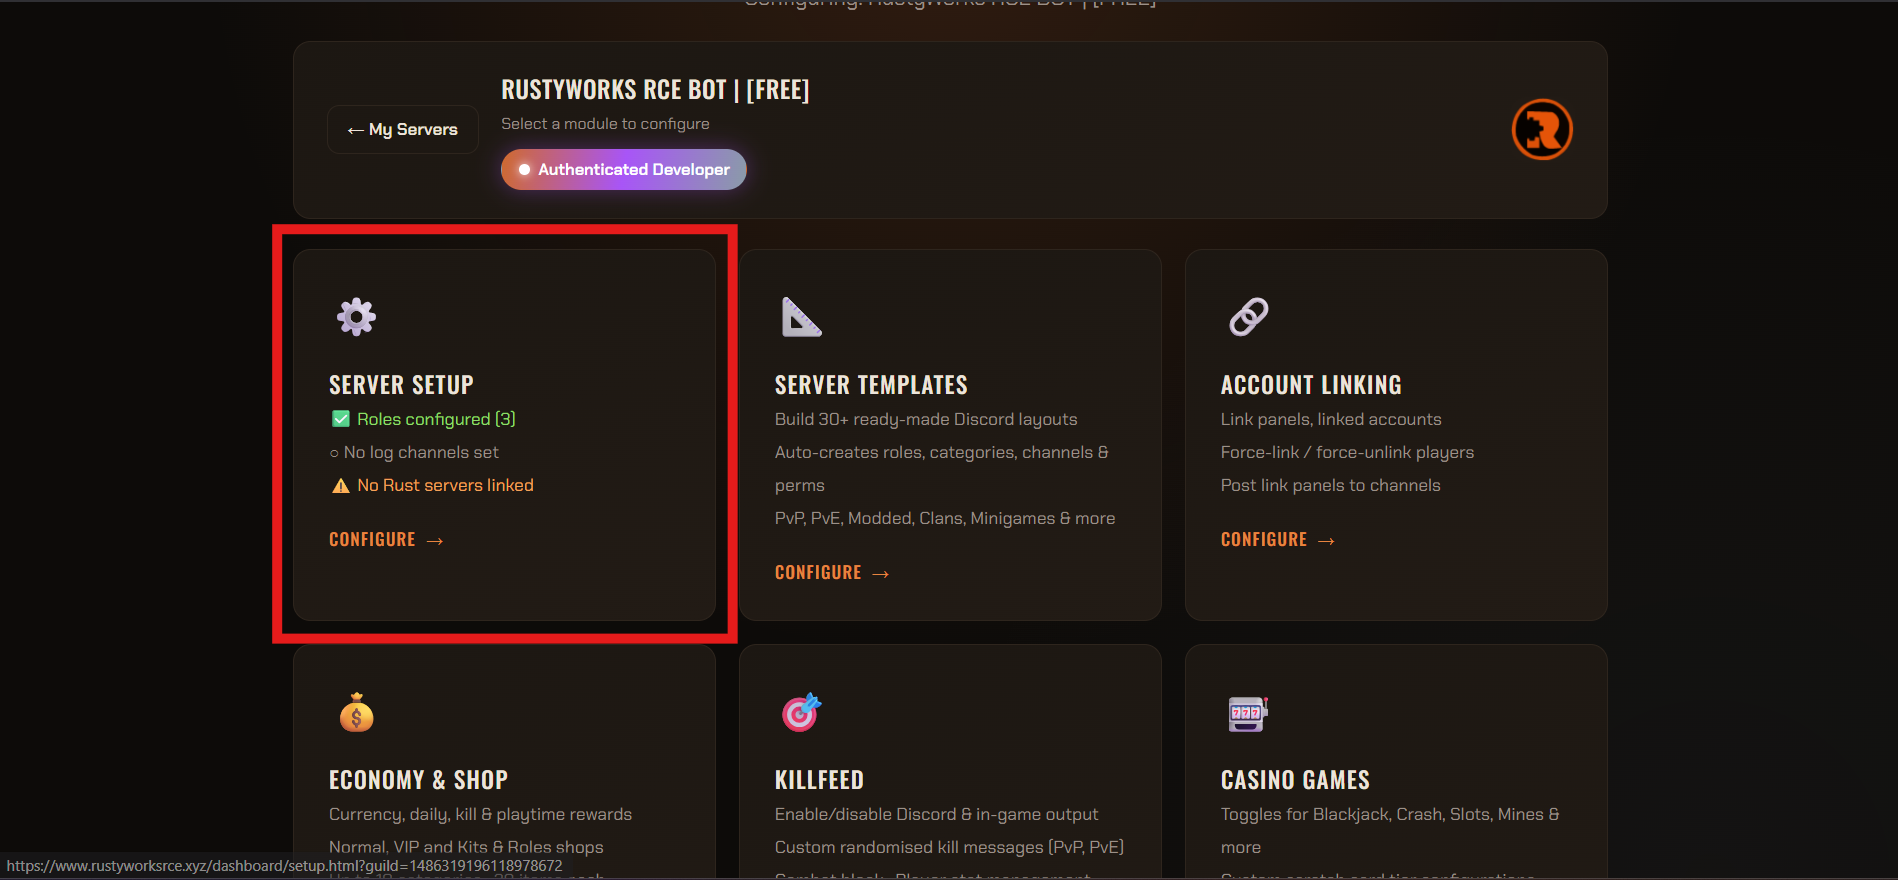
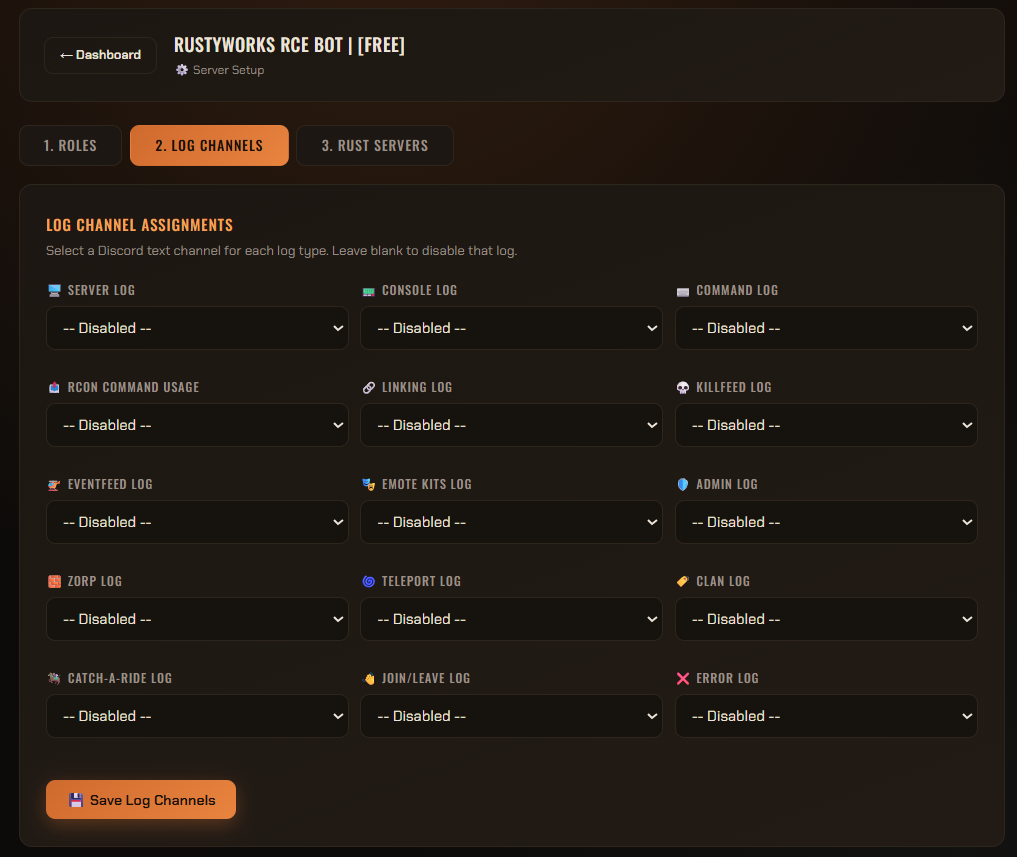
Log in to the RustyWorks website and click on Servers Configure. Click on your server to open its dashboard, then select the ⚙️ Server Setup module.
Configure Roles
In the 1. Roles tab, use the dropdowns to assign your Discord roles to the bot's permission levels.
- Owner & Linked roles are mandatory.
- You can assign multiple bot permission levels to the same Discord role if you wish.
Click 💾 Save Roles.
Assign Log Channels
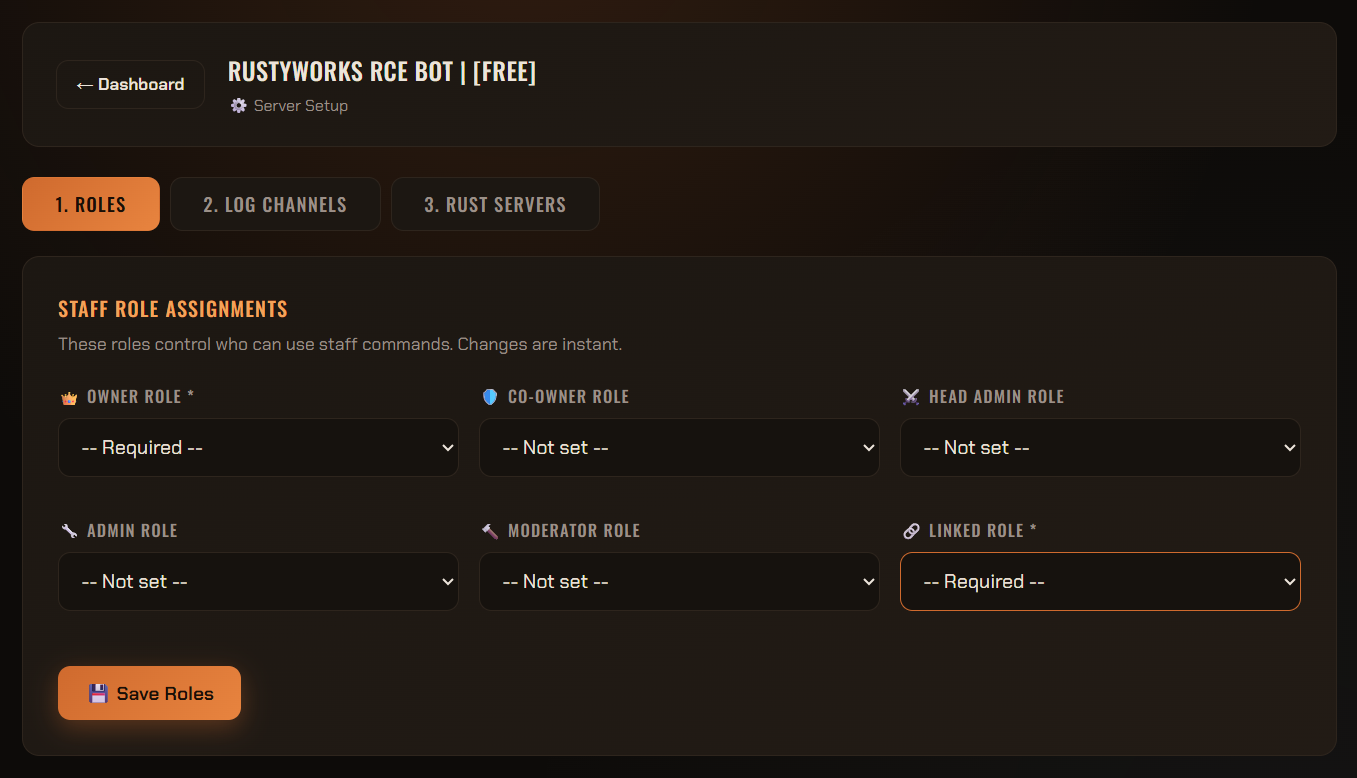
Switch to the 2. Log Channels tab. Here, you map specific bot activities (like Killfeeds, Admin commands, etc.) to specific Discord channels in your server.
If you leave a dropdown set to -- Disabled --, the bot will simply not log that activity.
Click 💾 Save Log Channels.
Connect RCON
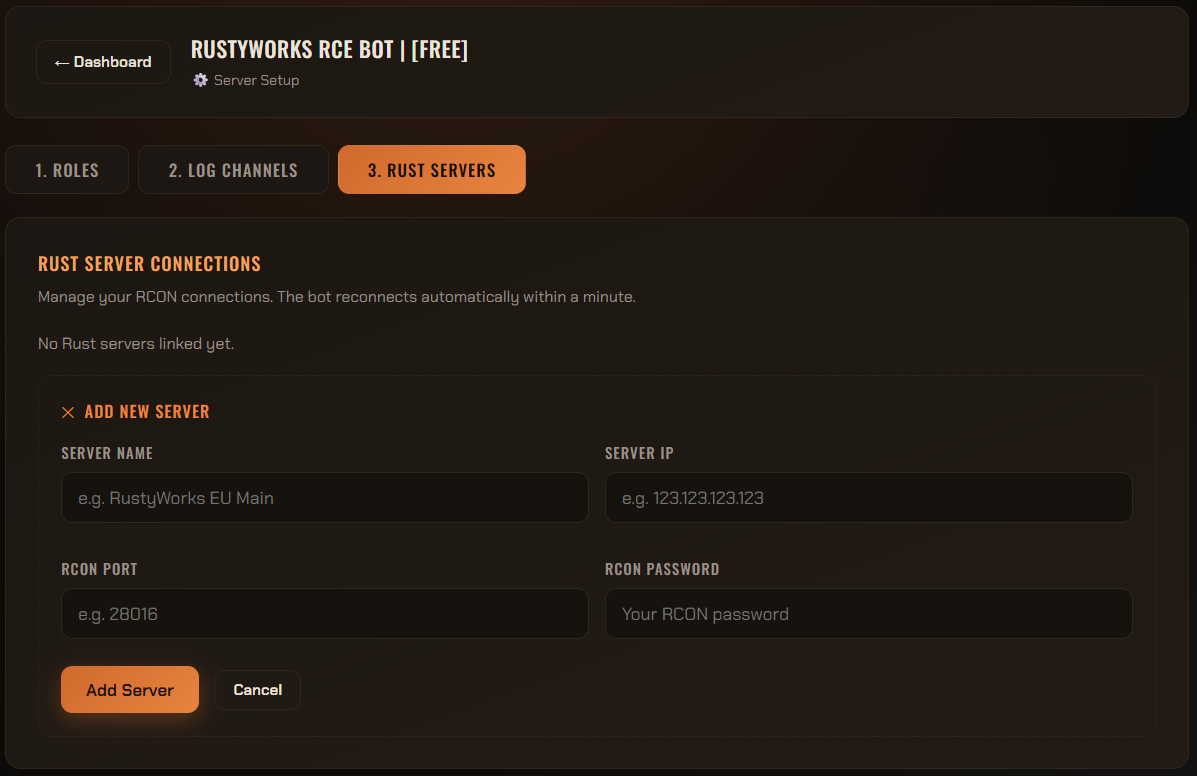
Switch to the 3. Rust Servers tab and click + Add New Server.
Fill in your Server Name, IP, RCON Port, and RCON Password. Click Add Server. The dashboard will test the connection instantly and save it if successful!
Route B — Discord command
If you prefer not to use the website, you can complete the exact same process directly inside your Discord server using the interactive setup wizard.
Start the Wizard
In your Discord server, type /setup server and hit Enter. The bot will reply with an interactive interface containing three blue buttons: 1. Roles, 2. Logging, and 3. Server.
Configure Roles
Click 1. Roles. The bot will guide you through assigning each role one by one.
For each prompt, use the dropdown to select an existing role, or click the green ➕ Auto-Create button to have the bot automatically make a role with that name for you.
Configure Logging
Click 2. Logging. You will be given two choices:
- 🪄 Auto-Create Channels: (Recommended) The bot will automatically create a "RustyWorks Logs" Category and generate all 14 logging channels inside it for you instantly.
- ✋ Pick Manually: You can select existing channels one by one from a dropdown.
Connect RCON
Click 3. Server, then click the Enter RCON Details button. A Discord form will pop up.
Fill out your Server Name, Server IP, RCON Port, and RCON Password. Submit the form, and the bot will attempt to connect.
Need human assistance?
If you're stuck on RCON connection issues or need help configuring a specific module, our community is here to help.